This week is a special week... it's the 11th Anniversary of JessicaLynnOriginal and we're celebrating all week long! HAPPY ANNIVERSARY!!!
Each day this week a different design team member is featuring a JLO image on her blog - with a bit of show and tell. We have each been asked to show a little something extra this time - our cardmaking process, our coloring skills, a special technique or fold. That sort of thing.
I love layering with black cardstock, so my first intent was to make two cards - mostly identical, only one with the black layering and one without... to show how much difference that makes. But then I got a different idea... and went a different direction. I chose to show you a rather unique fold, and how I made it.
These are the items I started with:
The card base is 8 1/2" x 4 3/4". It is scored in the middle (4 1/4") and also 2 1/8" from each end.
The layers of designer paper and matting matches each of the panels.
There are two cardstock circles, scored in half, and a 1" x 4 3/4" piece of cardstock scored down the middle lengthwise.
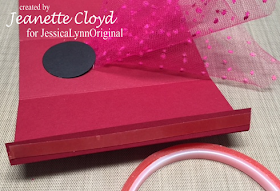
A square of netting was bunched and attached to the back side of the card base, using an additional cardstock circle to hold it in place.
Sticky strip was adhered to both halves of the 1" x 4 3/4" strip of cardstock and it was attached to the inside of the card base, creating a box-like card that stands on its own.
The two scored circles were adhered to the "box" with sticky strip.
Brentwood - Happy Valentine's Day I Love You Brentwood (to be exact) - was adhered to those two scored circles. A gem heart was added for embellishment.
Here's the other side:
Thanks for stopping by my blog today!
Image/Sentiment: JessicaLynnOriginal Happy Valentine's Day I Love You Brentwood
Ink: Memento Tuxedo Black, Copic Markers, Zig Wink of Stella Marker, and a gel/glitter marker from an unknown vendor
Cardstock: Recollections 110# Black and 110# White and Stampin' UP! Cherry Cobbler
Designer Paper: from my scrap file
Embellishments: Heart Gem and Netting from unknown vendors


Love the step by step instructions on your card. I have got to try this out!! thanks for sharing this cute Brentwood!!! New follower!!
ReplyDeletePaula Driver
I love the netting that's so cool!
ReplyDeleteI love the step by step how to.. great job. That is one of my favorite Brentwood Owl sets too!!
ReplyDeleteJess
Very cute! Love the addition of the netting and pink and black are such great colors together.
ReplyDeleteStunning card Jeanette and great instructions - love it :-)
ReplyDeleteBlessings
Maxine
How cute is that!! Awesome design, Jeanette!
ReplyDeleteWhat a great technique! Thank you for the detailed instructions! I will definitely be trying this one in the near future!
ReplyDeleteSuper creative with a super cute outcome! Luv it!
ReplyDelete